 Memory-Map 2004 is a mapping solution for PCs and PDAs which when connected to a NMEA or SiRF compliant GPS receiver will display your position on a moving map. Memory-Map 2004 is a mapping solution for PCs and PDAs which when connected to a NMEA or SiRF compliant GPS receiver will display your position on a moving map.
The Memory-Map product range has been rationalised with this release effectively all the product bundles now come with the PC and PDA software. This should make the choice of what to buy a little simpler.
The big news for UK users is the availability of the Ordnance Survey 1:25,000 Explorer maps for selected areas of the country. Something I have been waiting for for a long time now. These are packaged with 1:25,000 scale aerial photos providing a full 25k product for serious outdoor use.
The second big item in the package is 3D map representations where digital elevation data is available. This gives a relief view of your current displayed map. Even better (yes it does get better) when you display an aerial photo you get a near picture quality display.
Another introduction is a split screen. This feature allows you to display 2 maps side by side.
OK enough of my ravings lets get on with the review. Despite the fact that we have reviewed the Memory-Map 2003 product in full I am providing a full review of the 2004 Navigator here as well all new features will be highlighted along with a summary of these new items. In a slightly different format I have combined both the PC and PDA reviews into one document this should make it easier to read.
Contents
Overview
New features in Memory-Map 2004
Memory-Map PC Navigator
Memory-Map Pocket Navigator
Compatibility with Memory-Map 2003
Map Data and sources
Summary and Conclusion
Memory-Map 2004 Overview
The review package provided by Memory-Map comprised:
-
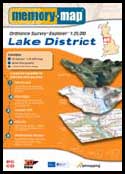
Memory-Map OS Explorer 1:25,000 Maps of the Lake District, Retail price £99.95
-
Memory-Map OS Landranger 1:50,000 maps for region 7. Retail price £39.95
This review will cover most of the functionality of Memory-Map but its main focus is on the areas which are used for Pocket Navigator either directly or indirectly. The review is centred around the Navigator product for OS Landranger maps. Other map coverage is dealt with towards the end of the review. It should be emphasised that there are other features in Memory-Map that we do not cover.
Although the digital mapping available for Memory-Map is very much targeted towards the UK market, the availability of the maps is world wide. Memory-Map provides the ability to use commercially available maps and charts in various formats, free USGS maps and other geo-referenced images available for purchase or download from the Internet.
The software provides a selection of facilities to manage your maps, waypoints,routes and tracks. These range from freehand plotting of tracks and routes on your map, to filing and organising your waypoints.
Introduce your GPS either bluetooth, sleeve, CF GPS, or external GPS receiver and you have a complete navigation system.
Memory-Map is commercially produced software which is available Worldwide. There are two product streams available: Ordnance Survey Edition and Global Edition. The difference is mainly the restrictions that the UK Ordnance Survey place on the usage of their data products.
|
Memory-Map FEATURES:
-
Upload/download waypoints, routes and tracks into your GPS receiver,
or Pocket PC
-
Use with commercial OS Landranger, nautical charts, topographic,
aeronautical or street maps
-
Search
and display database of over 250,000 places, hills, mountains,
rivers, lakes, farms and forests.
-
Draw
routes freehand
- Navigate
in real time along a defined route
-
Elevation profiles of routes
-
Attach files (pictures and sounds,etc) to waypoints
-
Print Maps
-
Night vision displays
-
Real-time GPS navigation
-
Upload map or map section to a Pocket PC
- Display 2 windows side by side
- Draw tracks onto maps
- Add text annotations to maps
- 3D visualisation of maps
|
MAP
COMPATIBILITY:
- Ordnance Survey 1:25,000 Explorer digital maps of the UK
- Ordnance Survey 1:50,000 landranger digital maps of the UK
- Getmapping digital Aerial Photographic maps of the UK
- Ordnance Survey 1:250,000 Great Britain Road Atlas
- Philip's Digital European Road Atlas
- A-Z digital street Atlases
- CAA VFR digital charts of the UK
- Maptech worldwide marine charts
- Any digital BSB map or chart (including Maptech products)
- USGS DRG topographic maps
- Download Internet maps
- Create
your own geo-referenced maps.
|
For the purposes of this review an Toshiba Tecra with 128Mb Ram and 500Mz Pentium III processor were used. The GPS used was a Garmin Geko 301 (supplied courtesy of Garmin UK) and interface cable (provided by PC-Mobile).
New Features for Memory-Map 2004
The main new features for the PC Navigator are:
- 3D View: The ability to display the contents of the map window in a new 3D window which allows you to pan and rotate the map.
- SyncWindows: This feature allows you to have a split screen with two different maps displayed in each window. These can be either synchronised or independent.
- AutoTrack: This allows you to draw and save tracks on the mapping surface.
- TextNotes: Allows annotations to be added to maps and aerial photos.
- DID I MENTION MAPS? Of course the main new feature for my money is the 1:25,000 OS Explorer maps.
- On the PDA there is a new management display for routes, tracks, waypoints, and the new TextNotes.
- The PDA software also has support for a much wider range of GPS protocols, including SiRF
Memory-Map Navigator (PC)
 System Requirements Memory-Map Navigator: System Requirements Memory-Map Navigator:
Microsoft Windows 98, ME, NT, 2000 or XP. 32Mb RAM, 100Mb Hard Drive, 12x CD. Minimum screen: 800 x 600. Internet Explorer 4.0 or later. 3D view may require additional graphics card.
Software Installation
The software and maps are supplied on one or more CDs depending which package you have bought. See mapping for more details about the available packages.
A brief installation sheet is provided helping you to get started and register the application. The package contains a quick start guide.
The installation of the software is easy as would be expected for a professional product such as this. The software is licensed using a serial number which can be found on the installation sheet. Product activation requires access to the internet, or phoning a registration number. This will resulting you being supplied with an activation key which needs to be entered into the registration display.
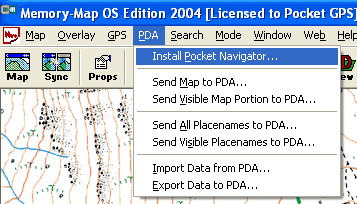
The PDA software is installed from the PDA menu in the main application. This is described in more detail in the Memory-Map Pocket Navigator review.
Opening a map in Navigator
Before you can do anything you need a map, and to use a map in Navigator you need to register them. Navigator now calls all maps Maps as opposed to "charts" as in MM2003. Registering maps is a reasonably simple process of placing the CD into to computer, selecting the refresh map list button on the map list dialogue and letting the application do the rest.
Maps can be obtained from a number of sources: included with Memory Map are the OS maps on the CDs ; you can purchase additional maps and charts on CD; you can download maps from the Internet, typically USGS DRG topographical maps, Terra Server satellite images; BSB format maps and charts.
With the Memory-Map 2004 OS Edition Ordnance Survey has demanded that the ability to calibrate your own maps is removed from the software. For some strange reason the draconian agency, funded by UK tax payer's money, seeks to limit personal choice and freedom by creating a number of artificial restrictions to your software.
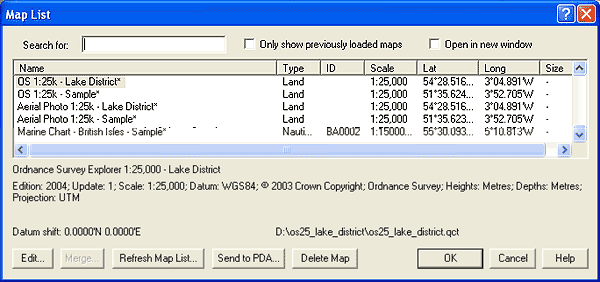
There are options to import the charts into your computer to enable the maps to be used without needing the CD. This will create the native Quick Chart (.qct) files on your hard drive. You will need quite a lot of disk space to handle them but things will be much faster when running the application.
When you register USGS DRG format maps then the system will produce a small file in the chart cache with the geo-referenced details. This may take some time depending on the available charts. If you import charts then the software will convert them into the proprietary Memory-Map QuickChart format, these are then stored in the Memory-Map chart cache.
Once a map has been imported the Edit button can be used to modify some of the controlling information and to assign keywords. This can become very useful to assist in finding maps when you have a large number registered. With the OS maps it is not really a problem as the maps come in 12 files representing the 12 regions of the UK, or 10 files for the areas covered by the 1:25,000 Explorer OS maps. If however you use the USGS DRG maps then just 1/6 of Florida has 117 map files multiply that by 6 and you get over 650 files for Florida. That can become difficult to organise.
Using the software
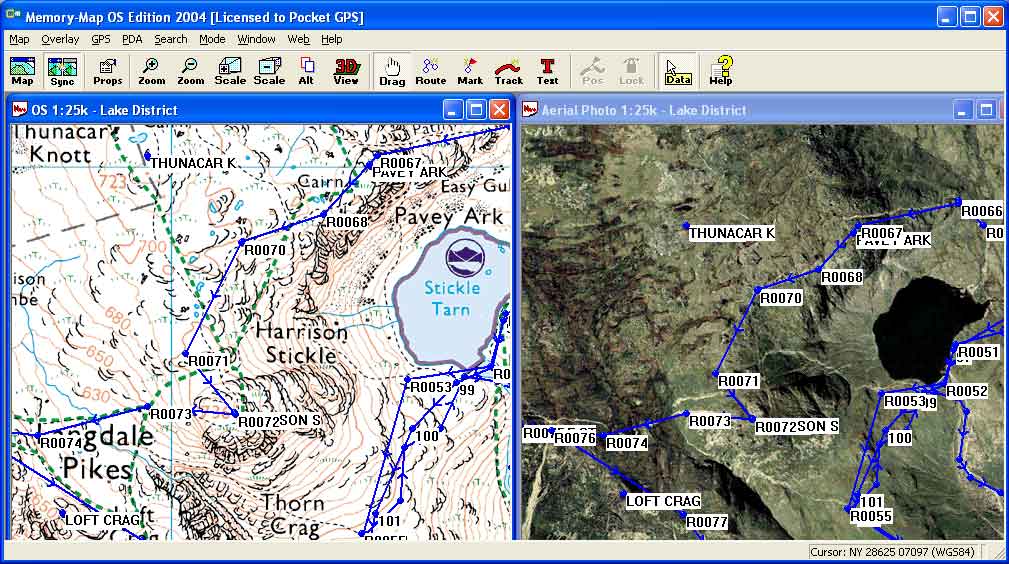
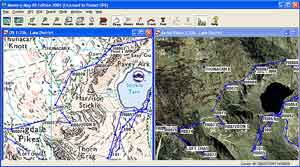
When you start Navigator you are presented with the last map or chart you had opened. This has a menu bar and tool bar as shown below:

The menu options provide detailed control of the software whilst the toolbar gives access to the immediate and most used functions of the application. For those of you who have seen MM2003 you will notice that there are 5 new items on the toolbar and one missing. We now have sync, 3D View, Track, Text, and Pos, whilst we have lost the MOB button. Proof that the application is shedding its nautical roots.
The map button opens up the Map List dialogue allowing you to open another map or register new maps and charts.
The New sync button splits the display into two windows initially both containing the same map or chart. Once in the split view the synch button toggles the synchronised display of the two windows. You can select different scale maps in the two windows but have the panning and movement of the maps synchronised.
The props button is probably the most useful button providing access to the property screen for the routes, waypoints, tracks, and Text overlays as shown below. This allows for management of these mapping components.
The Zoom buttons zoom in and out on the current map. There are limits to the levels of zoom available for the displays.
The scale buttons locate and load maps and charts of a greater or lesser scale at the cursor position. When finding upscaling or downscaling maps the zoom levels stay similar thus when scaling from 1:1,000,000 to 1:25,000 a lot of map data is read in. This can result in a very long time to rebuild the display.
The Alt button displays the Alternative View.
The new 3D View button takes the active window (if the display is in the split mode) and creates a three dimensional representation of the terrain then drapes the map or aerial photo over it.
The next seven buttons define the mode of the cursor:
-
Drag: Presents a hand cursor which allows you to click and drag the map.
-
Route: Allows you to click and build a route.
-
Mark : Creates (marks) waypoints.
- Track: (New) Allows a track to be drawn freehand
- Text: (New) Selects the TextNote tool permitting the map to be annotated.
Pos: (New) This replaces the MOB button an places a mark (waypoint) at the current position (only valid when GPS active and fixed).
Lock: Keeps the GPS position in the centre of the screen (only valid when GPS active and fixed).
The Data button when depressed will show the co-ordinates of the cursor, and when the GPS is active the data shows the bearing and distance to the current position.
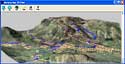
The
Navigator Window
The
image to the right shows the Memory-Map window. Clicking on
the image will display a full size version of the screen.
From here you can see all of the features of the application.
The navigator window can be the standard single window, or if you press the Sync button it will split into two panes which can have different maps in them. Both of which support the ALT view as well.
So you can have access to 4 different maps/zoom levels.
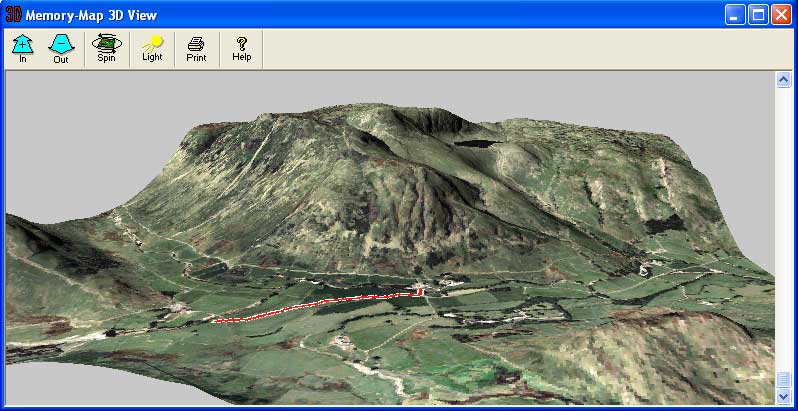
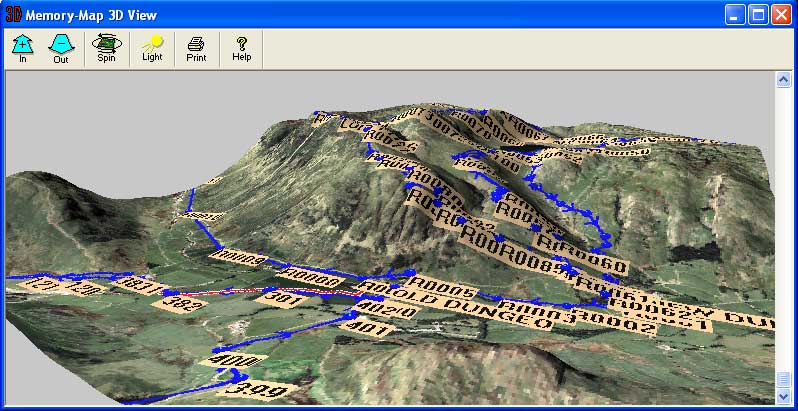
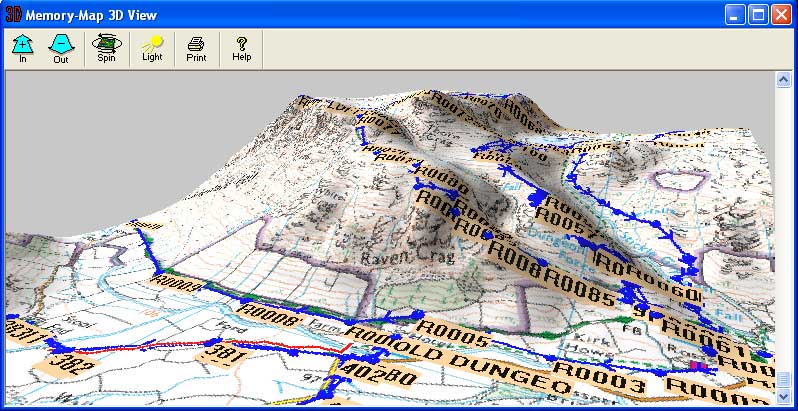
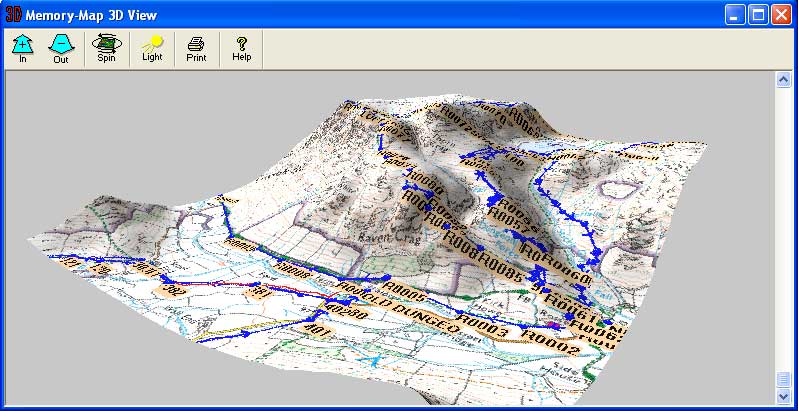
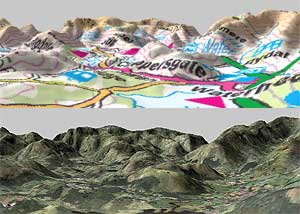
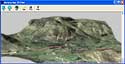
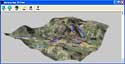
Far and away the biggest new feature of the software is the new 3D view. This view is often looked on as being a little gimmicky I can assure you it is not.
|
Click for a full size image
Reproduced from Ordnance Survey 1: 25,000 mapping © Crown copyright. All rights reserved.
|
The 3D View Window (New in 2004)
 When you click on the 3D View button shown on the left Memory-Map opens a new window with a 3D model of the active map or digital photo. Basically what happens is that the elevation data for the area of the map you are viewing is converted into a wireframe over which the map is draped creating the 3D terrain model. The question of course is why am I describing this when you can view the resultant graphics. When you click on the 3D View button shown on the left Memory-Map opens a new window with a 3D model of the active map or digital photo. Basically what happens is that the elevation data for the area of the map you are viewing is converted into a wireframe over which the map is draped creating the 3D terrain model. The question of course is why am I describing this when you can view the resultant graphics.
 |
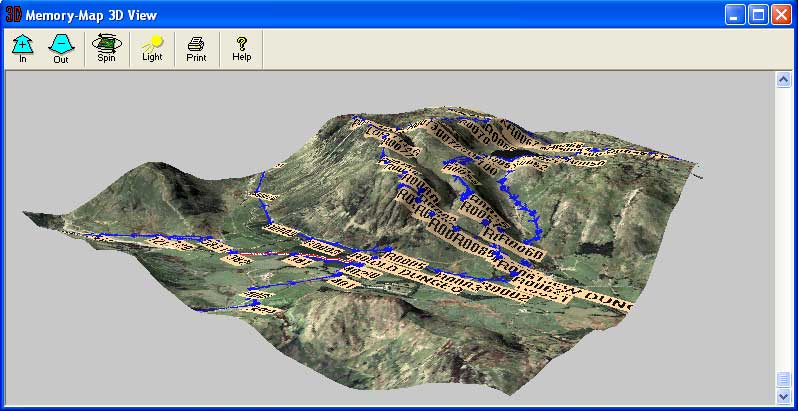
Is it a map or is is a photo? Difficult to tell sometimes, the effect is that good.
Obviously the image to the left is a photo and the one to the right is a 3D View of the GetMapping aerial photo. |
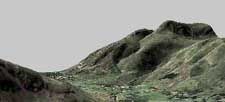 |
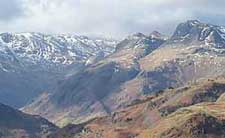
The 3D View window allows you to pan and tilt your map allowing you to view the terrain from just about any angle. This means that if you have photos of the area you can tune the view to replicate the photo. One of my favourite areas of the UK is the Langdales in the lake district, which is the area most of this review uses. Anyone who has ever been to the lakeside at Ambleside and watched the sun set will certainly recognise the map view below.
 This is a comparison between two images of the skyline from Ambleside pier. This is a comparison between two images of the skyline from Ambleside pier.
The top image was created using the 1:250,000 OS routing map that comes with all Memory-Map UK software.
The image on the bottom is the same area but using the 1:25,000 GetMapping aerial photos zoomed in to the same size.
This just shows how realistic this software is. If you click on the image you will get a full size graphic with more detail.
The 3D View has a number of options, allowing you to zoom in and out (but only on the section displayed), to spin the map round, and to adjust the light. In honesty the default lighting seems to be the best setup for this application, but you can change it to suit your purpose. The 3D view did have one irritating feature: after taking great pains to set up the display to the precise angle of view required if you leave it for a while it decides to automatically spin. This destroys your delicate setup and consumes huge amounts of processor power.
The 3D View doesn't just show the maps in relief format, it will also display all your active overlays as well. When you request the 3D view the program takes a snapshot of your map window and renders it in 3D. There is no real time element to the display. This means that you need to have all your overlays displayed before entering 3D mode. You cannot create a waypoint and view it in the 3D window without re-creating the 3D window.
In an effort to produce the best possible preview of the 3D functionality I have provided a number of thumbnails of the screens which you can click on for a full sized view.
Click on the thumbnails for a full sized view of the 3D windows.
Organisation of Features
The components of the system are managed in two sections: Maps and Charts (defined to be Maps), and Waypoints, Routes, Tracks, TextNotes, and Positions (defined as Overlays). The Maps section was described above. The overlays are described below.
There is generally more than one way to access each of these features. The main maintenance is provided by the properties button. This opens the overlays dialogue.
 The Overlay Properties Dialogue The Overlay Properties Dialogue
The overlay properties can be accessed from the toolbar by clicking on the Props button.
The overlay features basically consist of the main components as defined above, but there are other categories which appear in the waypoints as well. These are : Proximity Alarms, Hotspots, and Position. These enable quick and easy access to these add on elements to the waypoints.
There is no structure to the overlays so if you need to add structure to your routes or waypoints then a manual system needs to be used. Prefixing all routes for an area with the same code would group them together. For instance all routes in the UK Lake District could be prefixed with LD_.
This is not so critical with routes but much more so with waypoints. Each route can have a large number of waypoints, and by default they are sequentially numbered. Consider the management issues of 200 routes with 50 waypoints each. This would be 10,000 waypoints
 TextNotes (New in 2004) TextNotes (New in 2004)
A text note is a new overlay type for 2004 which allows you to create a label, or note that you want to attach to a specific location. The TextNote has a name and a description. The name is not displayed on the map under normal circumstances, but is when you hover over the text.
I would have thought that the default should have been the other way round: the name is displayed normally and the description displayed when hovering over it. If you have a large number of notes on the map then these will soon cover up the map detail.
There are no settings to determine how the TextNote is displayed. It is either displayed or hidden with the full text shown.
 Waypoints Waypoints
Waypoints are the basic positioning elements in GPS mapping. Using a standardised identification system, normally WGS74, a specific location can be recorded on your GPS device and then used later to show the position on a map.
Waypoints can be placed on your maps using the Mark button. Pressing the mark button enables the waypoint placement when the mouse is clicked with the cursor over the map. The cursor then reverse back to the drag mode.
The waypoint can be moved clicking on the icon and dragging it to the new location. This can be quite effective when upscaling the map and being able to refine it's location.
The MOB waypoint has been replaced with a position mark this drops a waypoint at the current GPS location.
Waypoints are a good way of checking map calibration as they are not specific to a map and can be displayed on any map where they are located. This means that you can set waypoints at say a church on one map and check that it is positioned properly on another map.
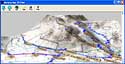
The picture to the right shows a route in Zion National Park in USA. If you look at the start of the trail the T in the red circle is the Trail head waypoint if you note there is a hatched red zone surrounding the waypoint. This is the proximity zone.
The proximity zone and a file attachment are configured in the waypoint property sheet. Once configured they will also appear in the Proximity Alarm and the Hotspot sections of the overlay properties.
Routes
Routes are a series of points linked together. There can be a number of routes in the routes overlay.
Creating a route is a simple matter of clicking on the Routes button in the toolbar and then just clicking at crucial positions on your proposed journey until you have created your route. Each point you click on creates a waypoint in the overlay library. You can then process this waypoint in the same way as normal waypoints.
If you need to add an additional waypoint into your route then simply right click on the route and then insert waypoint and then drag it into position. In fact you can change the route easily by using click and drag on the route's waypoints.
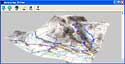
I was quite skeptical about the usage
of the GetMapping 1:25,000 aerial photo maps. |
Reproduced from Ordnance Survey 1: 50,000 mapping © Crown copyright. All rights reserved.
|
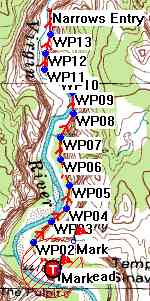
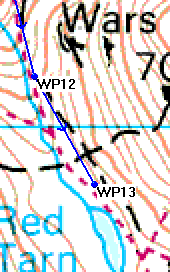
When creating a route in the Lake District at 1:50,000 I followed the marked footpaths to create the route. I then thought I would try the aerial photos and see what the route looked like. I was extremely surprised to be able to refine my route by moving the waypoints over the clearly visible footpaths. The extracts of the route shown to the right clearly show Red Tarn in the Langdale Valley and show the route comparisons at different scales. Even with the new 1:25,000 maps which are far more detailed than the 1:50k ones the aerial photos show where the real tracks are not where the official ones are.
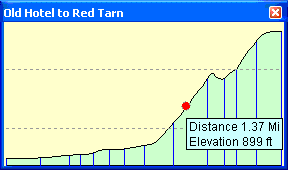 One nice feature of the OS mapping data is that it also contains elevation data (obviously essential for the 3D representations). This means that when in data mode you can move your mouse over the route or anywhere on the map and not only will the precise co-ordinates be displayed, but the height will also be shown. This is quite a useful feature in itself, but Navigator takes it one stage further and presents you with an elevation profile display as shown on the left. One nice feature of the OS mapping data is that it also contains elevation data (obviously essential for the 3D representations). This means that when in data mode you can move your mouse over the route or anywhere on the map and not only will the precise co-ordinates be displayed, but the height will also be shown. This is quite a useful feature in itself, but Navigator takes it one stage further and presents you with an elevation profile display as shown on the left.
The height is somewhat exaggerated, but it gives a good idea of the profile of your route. Moving the cursor within the profile window moves the red marker along the profile and also moves an indicator over the map. Right clicking on this window allows the setting of the scale to true, Fixed 200M and Autoscale to fit the window size.
Tracks
 Tracks are essentially a sequence of points that are automatically recorded either by a GPS or by Navigator itself. Navigator treats these as a special type of overlay. If the PC Navigator is connected to a GPS device then the "active track" is displayed on the screen as you move. Tracks are essentially a sequence of points that are automatically recorded either by a GPS or by Navigator itself. Navigator treats these as a special type of overlay. If the PC Navigator is connected to a GPS device then the "active track" is displayed on the screen as you move.
Tracks can be recorded using Pocket Navigator and imported into PC Navigator for analysis. There are facilities to edit tracks by removing erroneous track points, but there are no facilities to add additional trackpoints to cover areas where no GPS signal was received. You cannot combine tracks. There is a feature in the track overlay properties which allows tracks to be reduced. This effectively removes intermediate points from the track, ultimately leaving you with a single line of 2 points.
Multiple tracks can be displayed at a time, and using the Overlay properties you can toggle the track display on and off.
AutoTrack (New in 2004)
AutoTrack is a feature that allows you to draw, either freehand or by point and click, a path on a map. Strange 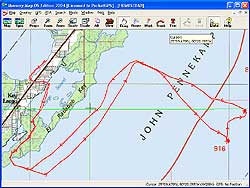 you say we already have routes so why would we want this. Well there is a subtle difference. you say we already have routes so why would we want this. Well there is a subtle difference.
The Memory-Map tracks are stored as a sequence of trackpoints all in one track. A route is stored as a list of linked waypoints, the waypoints need to exist to create the route.
Essentially if you do not need navigation instructions then the AutoTrack feature is for you. This allows you to draw your planned path and then follow it using your GPS. This saves a lot of space, but more importantly you don't need a waypoint for each section of your journey.
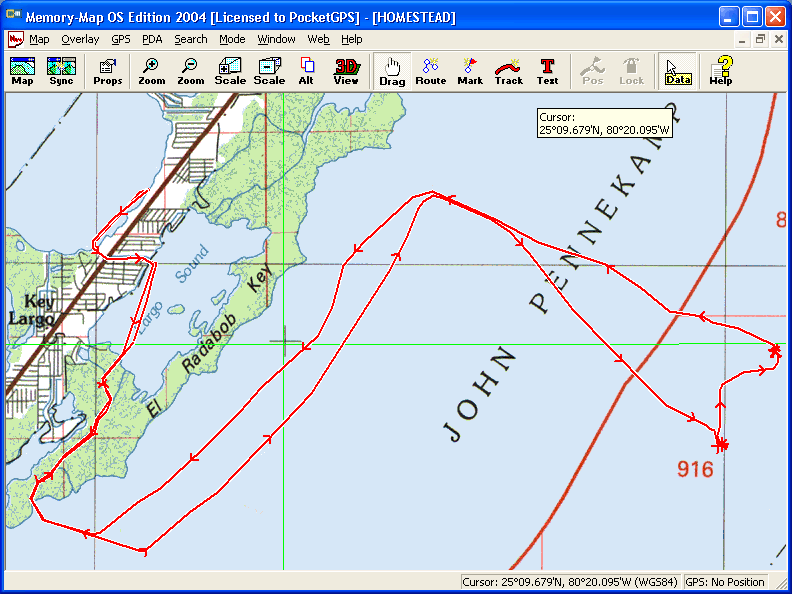
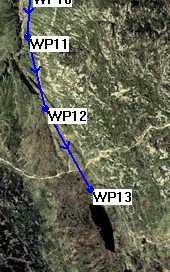
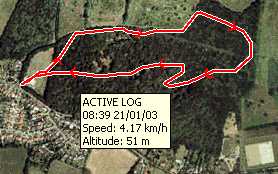
The image to the left is a track downloaded from the Garmin Geko 301. Unfortunately the batteries failed during the return journey. When I imported the track to the desktop I used AutoTrack to add a new track to complete the trip log.Click on the map for a full sized image. Here I was using USGS map data, but the US Coastal charts would have been more appropriate.
Other Features
Memory-Map Navigator has many other features but these are not related to its use for the PocketPC, it can interface to traditional GPS units such as Garmin and many others, you can create picture or other file attachments to waypoints, you can change the icons displayed with way points, etc. This review has focused on the features used to create, communicate and analyse data used with Pocket Navigator.
Memory-Map Pocket Navigator
Memory-Map is targeted at the recreational user. This software is useful for and used world-wide by hikers, bikers, off-roaders, sailors, and pilots, plus many more. Memory-Map can license the software for commercial applications.
Pocket Navigator System Requirements:
Microsoft Pocket PC (Windows CE3.0 or later) 16Mb RAM. PC ActiveSync connection (including 3.7.1).
All Maps need to be converted and exported to the PDA using PC Navigator. You have to acquire commercially calibrated maps (a good selection is supplied by Memory-Map) or create and calibrate your own maps then download them to the Pocket PC.
The main features packed into the CE software are:
-
Display of commercial and user created maps.
-
Live display of current position using NMEA 0183 or SiRF GPS interface
- Upload and Download of overlay data to handheld GPS
-
Display and logging of track
-
Creation and display of waypoints (positions on your map)
-
Display of route
-
Navigation instructions based on route
-
Tight integration with the PC version of Navigator
For the purposes of this review an iPaq 2210 was used with an Emtac BT GPS and a Garmin Geko 301(courtesy of Garmin UK) and interface cable (supplied by PC-Mobile).
| Software Installation
The
Pocket Navigator software comes bundled with the PC Navigator software.
Installation is a little
unusual in that it is started from within the PC Navigator application.
It is a really simple process. All you have to do is connect your
PDA via activesync then select Install Pocket Navigator from the
PDA menu, Navigator handles the rest.
If you own MM2003 then Memory-Map 2004 is installed as a separate application. However they seem to share the same drivers and you cannot run both together.
The
Pocket Navigator application does not need any licensing as
it takes the registration details from the PC application. Once
installed all you need to do is download a map and off you go.
|
Reproduced from Ordnance
Survey 1: 25,000 mapping © Crown copyright. All rights reserved.
|
The PDA menu is the main control interface between the PC and the PDA. As you can see from the graphic above This is used to send maps, database items, and to transfer tracks, routes and waypoints to and from your PDA.
Creating a map
To use Pocket Navigator you need maps in the Memory-Map proprietary Quickchart format. These are created by Navigator either by using them natively, or by converting different formats when downloading to the PDA. You do not have to worry about these conversions the Navigator software handles all the intricacies. All you need to do is select the area you need to transfer. You can send either the visible display window to the PDA, or the entire chart.
Memory-Map like other applications of this type use raster image maps. Unlike vector maps raster maps are scanned bitmap images and therefore will look identical to traditional paper maps. Because of this the maps and charts can be extremely large, particularly the full OS map sections. for example the Nautical Chart of the Thames Sea Reach is about 6Mb, the OS GB Route Planner is 22Mb, and the entire region 2 OS Landranger map is 332Mb. So it would be quite reasonable to store a number of the Nautical charts on a storage card, but impractical to store whole OS map sections. The trick is to be selective about which areas you need map detail for and load the OS GB Route Planner giving full coverage of the country, and where you need 1:50,000 scale maps select the area you require. With a 128Mb SD or CF card you can still get quite a lot of coverage.
I have 3 256Mb CF cards which I use to store my maps on. These are split into Nautical, USA and OS. I can see that I will n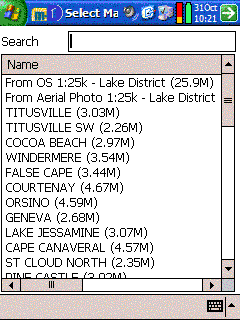 eed to buy some more cards soon for the 1:25k maps. Of course you can organise all your maps on a PC and just copy the ones you need onto a storage cards as you need them eed to buy some more cards soon for the 1:25k maps. Of course you can organise all your maps on a PC and just copy the ones you need onto a storage cards as you need them
If you are planning an extended trip then you must ensure that you have the maps for the regions you are visiting loaded on your PDA or storage cards as to transfer additional maps you need access to you PC with Navigator on it.
Using the software
When you start the last map or chart you had opened is displayed. If the map you last used is not available then the map selection screen is shown as displayed on the left.
Pocket Navigator uses a combination of toolbar buttons, menus and tap and hold context sensitive menus to control it's functionality. This can be quite confusing at times as it is not always intuitive and can sometimes be difficult to select the appropriate item when you have a waypoint, track and route all located at the same point.
In fact the user interface is not very intuitive and takes a little time to get used to. After a little usage it becomes much easier, and is worth the effort.
 The Toolbar The Toolbar
There are a number of icons on the screen which provide status information, or allow fast control of the application. This toolbar is permanently displayed and docked to the bottom of the display.
The first is the menu button which initiates the cascading menu system which is described below.
The next two buttons control the zoom function of the display. The zoom works by doubling or halving the information shown on the screen. The maximum zoom out seems to be limited to 200%, though this can sometimes be difficult to establish as there is no indication of the zoom level displayed.
The next button is the Alternative View toggle button. The alternative view allows you to quickly toggle between two different zoom levels of the same map or chart. Initially the alternative view displays the entire map but you can zoom in to say 25% or 50% which can give you a good location view and a detailed position view at the touch of a button.
The padlock button at first was confusing, but after a quick scan of the help file it turns out to be a GPS lock. When pressed it will have a white background and the GPS location will be locked in position on the screen, the map will move to keep the GPS position visible. If you drag the map then the lock will retain the current relative position on the screen. If you do not have a GPS fix then the padlock will be greyed out.
The next icon is the data button. When this is toggled and the display is tapped a small data popup is displayed. This shows the co-ordinates of the tapped location, and if the GPS is active the distance and bearing to the point is shown.
The final button is an information symbol. This is normally greyed out and only becomes active when there is a problem with the GPS communications. Tapping on this button displays the error message from the GPS interface.
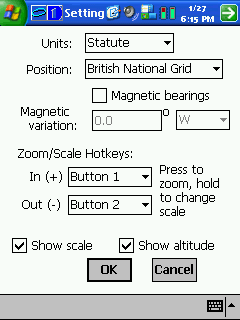
| Configuration
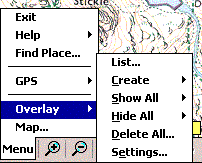 The
configuration options for the Pocket Navigator are accessed from
the menu toolbar option Menu-> Overlay-> Settings. This will
display the settings dialogue shown to the far right. The
configuration options for the Pocket Navigator are accessed from
the menu toolbar option Menu-> Overlay-> Settings. This will
display the settings dialogue shown to the far right.
From this display you
can set the main options for the software. There are not many items
selectable the main ones being the Units, and the position display.
The units can be set
to either Nautical, Statute, or Metric. This will affect the way
that distances, and heights are reported.
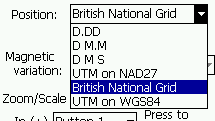 The
position can be reported in variations of Lat/Lon, 2 flavours of
UTM or British National Grid (Ordnance Survey co-ordinates). The
position can be reported in variations of Lat/Lon, 2 flavours of
UTM or British National Grid (Ordnance Survey co-ordinates).
You can also assign hardware buttons
to zoom in and out. There are options to show the map scale and
altitude where available. |

Click
on the picture for a full size image
|
 In Use In Use
The system is a little difficult to use initially and it takes a little getting used to. On the first impression there is not much functionality in the application. This is not the case, there may be just a single menu with a few items on it but most of the features are accessed by tap and hold context sensitive menus.
 As with similar applications you need to ensure that the map(s) covering the area(s) you are traveling to are loaded into the PocketPC, or storage card, and off you go. If you have a GPS configured then as soon as you start the application the GPS interface is started and you position is displayed. You must tap the padlock button to ensure that the current location is on screen. As with similar applications you need to ensure that the map(s) covering the area(s) you are traveling to are loaded into the PocketPC, or storage card, and off you go. If you have a GPS configured then as soon as you start the application the GPS interface is started and you position is displayed. You must tap the padlock button to ensure that the current location is on screen.
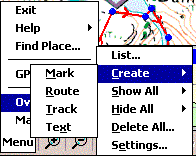
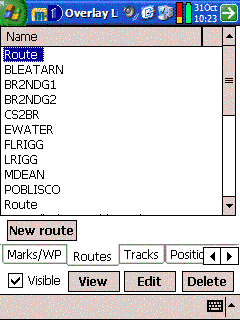
All routes, tracks and waypoints are grouped together and referred to as Overlays. Waypoints are called 'Marks' in Navigator. The menus allow you to hide or show either all groups or individual groups. Individual items such as routes or tracks can be hidden, but to show them again you need to show all again. The other group shown in the menu is charts, this shows an outline on the screen when other maps overlap the currently displayed map.
New in Pocket Navigator 2004 is a List option. This goes a long way to help the management of overlays. It allows access to all the different types of overlay and to the associated property pages. This makes the management and modification of waypoints, marks, routes, and textnotes easy. I would still like to see more of a tree structure so that all waypoints for a particular area can be grouped together under say Langdales, and those for other areas in another folder or group.
| 
Click
on the picture for full size image |
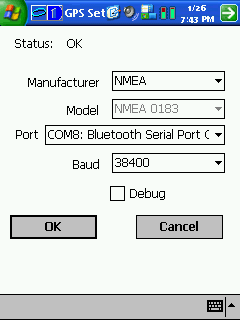
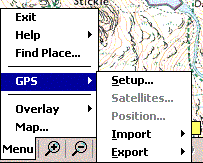
GPS
Displays
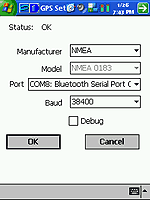
The GPS is configured using
the Menu->GPS->Setup option. This displays the screen shown
on the left.
The
configuration allows for connection to NMEA, Gamin, Magellan, or
NavMan. New in Memory-map 2004 is the SiRF protocol. Although there is a Model listbox this is fixed for all
options of Manufacturer. You then select the comms port and speed
and off you go.
Depending on the type of GPS manufacturer
selected options are enabled to either import or export your tracks,
routes and mark to the GPS unit. This is not documented in the help.
Out of curiosity I connected the
Garmin Geko to the iPaq and managed to successfully transfer waypoints,
routes and tracks between the two devices.
|
 |
Click on the picture for full size image
Reproduced from Ordnance
Survey 1: 50,000 mapping © Crown copyright. All rights reserved.
|
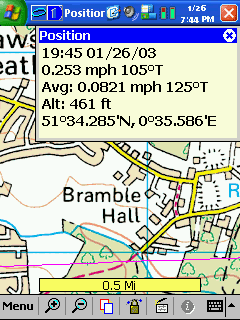
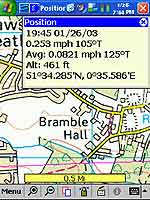
The other GPS related displays provide information about your position
and the number and strength of signal being received.
The image to the left shows your
current position speed, altitude, and average speed. In this example
the system was configured to display lat/lon, it can be configured
to show British National Grid (OS style) co-ordinates.
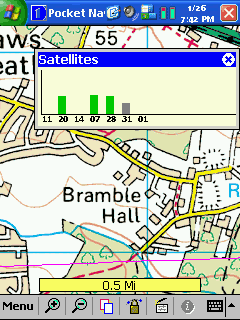
The picture to the right shows the
satellite status. This is the only status display in the system.
There are no NMEA output, or traditional sky view displays.
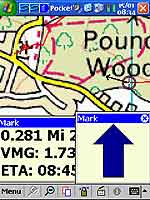
The final element of the GPS is the "Position Overlay" this is the current GPS position. One
of the properties of the position is a "velocity vector",
this shows how far you will travel if you keep on the same course
and speed.
|

Click
on the picture for full size image
Reproduced from Ordnance Survey 1: 50,000 mapping © Crown copyright.
All rights reserved.
|
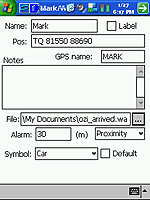
Marks
or Waypoints
Pocket Navigator uses the term Mark for traditional waypoints. I am not really sure where "Mark" originated, but Garmin use it on their handheld GPS devices, I guess it probably came from creating a pencil mark on a map.
These
marks can be assigned different symbols to indicate what the waypoint actually is. Waypoints can be associated with files making them hotspots. Waypoints can also define a radius around a waypoint making a proximity alarm.
Creating a waypoint is done from the Overlay menu using "Create Mark". Once you have selected this you tap on the screen at the point where you want the waypoint placed.
Waypoints are created with default settings. To change them you need to tap and hold on the waypoint which will bring up a context sensitive menu giving options for: Navigating to the mark, Opening a file, Hiding it, locking it, sending it to the GPS (Garmin or Magellan), removing it, or displaying it's properties.
|
Click for full size Image
|
The properties display shown above right enables various aspects of the waypoint to be configured.
Firstly you can name it the default name is "Mark". There appears to be no restriction insisting on unique names so if you are not careful you will end up with lots of waypoints called Mark. The tick box Label indicates if the waypoint name is to be displayed on the map. This is great for primary waypoints such as Mountain peaks, or for naming buoys. A little further don the display is the GPS Name this is separate to the Name because the handheld GPS receivers are more restrictive in their naming conventions.
The position is displayed and editable using the co-ordinate system specified in the options setup. This is one way of moving the waypoint to a precise location, another is to simply tap and drag the waypoint to it's new position.
You can associate a file with the waypoint. This makes the waypoint a
Hot Spot. You can browse to the required file and select it. A nice, and sometimes confusing, feature is that whenever a file is created in the "my documents" folder whilst Pocket Navigator is running will create a hotspot with the icon set to the icon of the application. As can be seen in the image to the right a screen shot had been taken a few seconds before this one leaving a picture in the
my documents folder. The icon for the viewing application is an eye. It took us quite a while to figure out what was going on. You can also make voice recordings, or notes which attach themselves to your maps.
|
Click for full size Image
Reproduced from Get Mapping © Get Mapping plc 2002. All rights
reserved. |

The alarm setting creates a proximity alarm for the waypoint. A proximity alarm waypoint is entered in meters radius from the waypoint, and is shown as a hatched red circle surrounding the waypoint as in the picture to the left. When you enter the area of the alarm the PDA default alarm is sounded.
The proximity alarm can be configured in one of two ways a Proximity Alarm as described above, or an Anchor Alarm. The Anchor Alarm sounds when you leave the proximity circle and continues until you are one nautical mile from the waypoint.
The final configuration option is the Icon to be displayed on the map. This can be selected from a small selection of images, or can be the icon associated with the attached file. Setting the default
tick box will make this the default icon to be displayed when creating additional waypoints. |
|
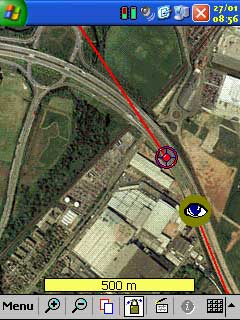
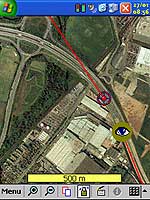
Tracks
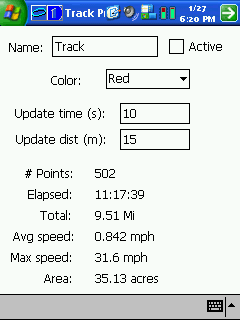
Tracks are recorded points on your journey. You can configure your tracks by tap and hold on the screen and selecting properties. This will display the dialogue on the far right. From this you can name tracks, colour them and set the point collection criteria.
You can also show
and hide the tracks on the map by selecting the show all or hide all option from the overlay menu, or by showing all tracks and then individually select, tap and hold and hiding the ones you do not want to view.
You can also reduce the number of recorded points in the track.
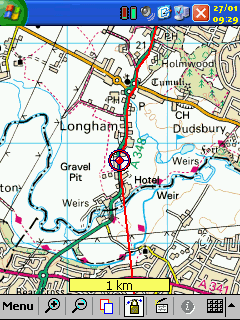
The image above on the right shows the track being recorded on a car journey in Hampshire. The circle is the current GPS position, and the straight line is the velocity vector.
|
 |
 |
|
Click
on image for larger picture
Reproduced from Ordnance
Survey 1: 50,000 mapping © Crown copyright. All rights reserved.
|
The velocity vector shows where you would be if you stayed on the same course for a certain amount of time.
There is no list of tracks or obvious way of splitting or combining tracks. |
| 
Click images for full size pictures
Reproduced from Get Mapping © Get Mapping plc 2002. All rights
reserved. |
Routes
and Navigation
Routes are a series of waypoints linked together. There can be a
number of routes in Pocket Navigator. Routes can also be created
in Navigator on the PC and downloaded into Pocket Navigator.
You can either create
a route on the PC or the PDA. To create a route tap on Menu> Overlay> Create
Route. Then you go to the map and tap at the critical points for
your journey, double tapping on the last waypoint. Your route is
complete, its as simple as that.
Oops I made a mistake
a couple of the waypoints are not in the right place. No Problem.
All you have to do is is tap, hold, and drag the waypoint to where
it should be. Forgotten to include a waypoint or need to refine
the route more, tap and hold in between the points on the route
the select the Insert WP option and just drag the waypoint to it's
required position.
When you are ready to
navigate the route all you have to do is tap on the route and select
the follow route option. This will start the navigation. As you
reach a waypoint in the route the next point will automatically
be selected. The images to the left and right show navigation screens.
When testing the application the navigation whilst walking was a little problematical as the velocity vector tended to be inaccurate, and thus the navigation pointer was often pointing in the wrong direction, despite a similar pointer on the Garmin connecting to the PDA showing the correct direction |
Click image for full size picture
Reproduced from Ordnance
Survey 1: 50,000 mapping © Crown copyright. All rights reserved.
|
The Navigation popup windows can be resized by clicking and dragging to make them smaller or larger. You can also close individual windows and place them where you want them on the screen.
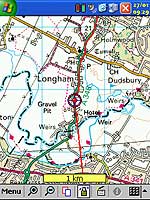
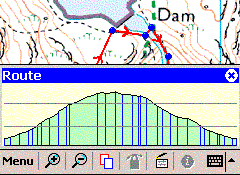
From the route context menu you can select profile. This will display the route's altitude profile. This is very similar to that of PC Navigator.
The profile display to the left shows the route profile for a gentle walk in the Langdale Pikes from the New Dungeon Ghyll Hotel to Stickle Tarn and back.
The vertical blue lines in the profile indicate where the waypoints are located on the route.
TextNotes
TextNotes are like post-its stuck onto the map. These have a Name, position and description. They also have similar properties to the other overlays, in that they can be visible or hidden. Like other overlays they can be moved on the map using click and drag.
These are a good tool for making notes about experiences on your travels, or maybe warnings or just to plan activities at certain locations.
The implementation of the TextNotes could be improved by allowing you to select the display of the name or the description. That way if you have a lot of textnotes in one area you can just show the name. Maybe this will be added in a future release. 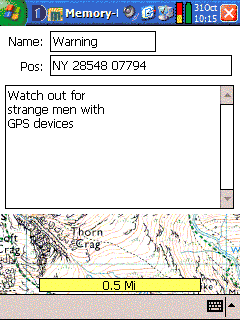 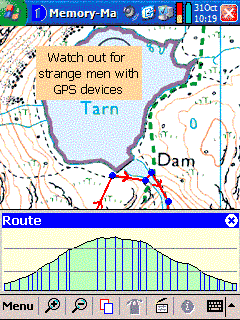
Compatibility
And so onto a potential problem area. Memory-Map 2004 (PC) is not compatible with Memory-Map 2003. When you put your 2003 map disks in the drive and try to register them you get the following error message.
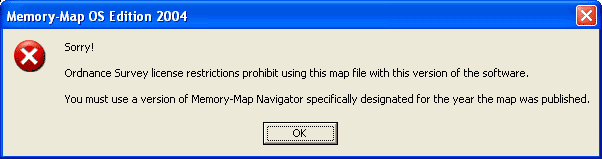
I am not blaming Memory-Map for this state of affairs. In their wisdom it would appear that a UK Government Agency funded by UK Tax Payer's money wishes to prevent people who have lawfully purchased licensed versions of their mapping products in what I would expect to be a perfectly reasonable manner. I would love a member of this agency to attempt to try and defend this shameful state of affairs.
The good news is that all other maps I have worked perfectly, and the exported maps from the 1:25k series work in both Pocket Navigator 2003 and 2004. Further investigations showed that the only issues seemed to arise from using different versions of the Ordnance Survey maps. Memory-Map 2003 (PDA version) uses both 2003 and 2004 maps, but Memory-Map 2004 will only use 2004 OS maps. This does not affect maps sourced from any other supplier.
Maps
Even if the software has the best functionality in the world it's usefulness really depends on the quality and quantity of the maps available for the package. Well if you live in the right part of the world the maps are really great. If not then it will be difficult using this system.
Fortunately for all of us living in the UK the major strength of the Memory Map Navigator package is the bundling of the UK Ordnance Survey 1:25,000 Explorer or 1:50,000 Landranger maps. The Explorer maps cover 15 of the popular outdoor pursuits areas of the UK. The Landranger maps cover the entire UK and also includes elevation data for the total mapping area.
In the tests that we carried out the maps were extremely accurate and very current. A road opened last year was present on the maps provided. Despite the rant above about compatibility and the restrictions placed on the use of map data I will commend the currency of the maps. The Ordnance Survey really do have excellent quality and up to date data.
If you are nautical you will also benefit from the ability of Pocket Navigator to use the Maptech BSB Nautical Charts. I have looked at the UK charts for the Thames region, but have not been able to review them as the sailing season does not start for a few months. I know a few people with boats and will be arranging to review these in the coming spring sometime.
If you are an aviator then you will find that Memory-Map has CAA 1:500,000 and 1:250,000 VFR Charts that cover the whole of the UK.
Users who either live or travel to America can use the USGS DRG maps either the free maps downloadable from the Internet, or purchased from various retailers. Although I was successful at importing these maps I was not able to verify the accuracy of the import.
 The review package was the "Memory-Map OS Explorer Lake District" and "Memory-Map Navigator OS Landranger region 7" The review package was the "Memory-Map OS Explorer Lake District" and "Memory-Map Navigator OS Landranger region 7"
Most of the examples and samples used in this review are taken from this map series. The available mapping data in the OS range is as follows:
Landranger 1:50,000 Series
Complete UK coverage £229.95
UK North £129.95
UK Central £129.95
UK South £129.95
Single Region £39.95
Explorer 1:25,000 Series
This series comes with both 1:25,000 scale Ordnance Survey maps, and also 1:25,000 scale GetMapping aerial photos. Targeted at the outdoor leisure market these maps cover the following areas in England and Wales at £99.00 each:
- Lake District
- Snowdonia
- Yorkshire Dales
- North York Moors
- Peak District
- Northumberland
- New Forest & South Downs
- Dartmoor & Exmoor
- Cotswolds
- Brecon Beacons & Pembrokeshire
The Explorer series is also available in Scotland, but this package excludes the aerial photos and is priced at £79.95. The available areas are:
- North Highlands and Skye
- South Highlands
- Ben Nevis and Glen Coe
- The Cairngorms
- Loch Rannoch and Loch Lomond
The quality of the digital OS maps is fantastic. The accuracy, of both the map detail and the calibration, is impeccable the sample shown below. Although I have shown an example of an urban map the application really comes into it's own when creating routes for walking, cycling and sailing. 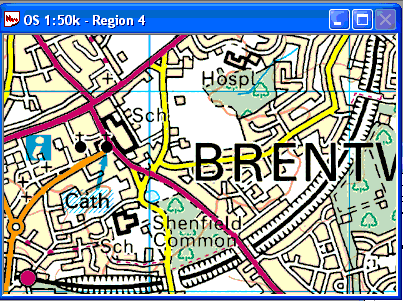
Reproduced from Ordnance Survey 1: 50,000 mapping © Crown copyright. All rights reserved.
Reproduced from Ordnance Survey 1: 50,000 mapping © Crown copyright. All rights reserved.
|
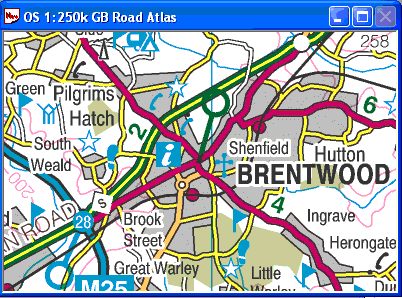
The CD also came with a full 1:250,000 scale Ordnance Survey Road Atlas, a large scale nautical chart of the UK coastal along with several sample maps and charts. These include both aviation and marine charts.
The Road Atlas contains all the Motorways, A and B roads with place names of 22,000 towns, villages and other locations within the UK. A quick scan of the database found Langdale Pike and Little
Totham.
The image to the left is an sample taken from the OS GB Road Atlas and shows the level of detail which is the same as the printed atlases available from garages and bookstores.
There are a large number of commercially
available mapping products which will also work with Memory-Map
Navigator. |
The OS 1:25,000 and 1:50,000 scale maps come with a database of a quarter of a million place names and features. These can be copied to the Pocket Navigator and used in a search.
If you live in the UK, USA or Australia, or a few other countries then you really cannot fault the maps for their availability. If, however, you want topographical maps of say the Italian Dolomite hiking trails then availability of digital maps is a problem.
Summary
PC Navigator Comments
The Navigator application lacks a lot of organisational features. A tree structure allowing you to organise maps, routes, etc into groups would go a long way to keeping control of your data, especially maps and waypoints. I loaded over 100 maps basically the central region of State of Florida at 1:24,000 and 1:100,000 plus many other maps and charts. With this number of maps I found it very difficult to locate one of the 6 OS maps that I had registered.
The Navigator still lacks the ability to manage tracks properly. You can now split tracks and remove individual track points, you can also draw your own tracks, but you cannot merge, or edit tracks. It is questionable whether you would need to but occasionally a GPS will record a wrong location you may then want to edit or move that point. I also have come across the situation when you want to extend a track because it wasn't recorded properly.
The data import features are also somewhat restricted, the only format available is Maptech. There is a cryptic message in the help suggesting that you can convert other formats and you should contact Memory-Map for details. I have a text file containing all the Mountain summits documented by Wainwright in England's Lake District but cannot use them in Navigator without further assistance. I did actually manage to import these in the end, but the process was not the easiest thing in the world.
On the plus side the route creation tools and elevation profile are easy to use. I created a route at 1:25,000 then loaded the Aerial Photo of the region at 1:25,000 and was able to adjust the route to overlay the exact position of the visibly eroded footpaths.
The 3D View which I thought at first would be a gimmick has really caught my fancy. I think it is a terrific feature helping you visualise the terrain before you get to your location.
Pocket Navigator Comments
There has been little change in the Pocket Navigator application with the exception of Overlay Management and enhanced coverage for GPS devices.
I think the overlay management will certainly help with a lot of the issues I had with Memory-Map 2003, but I would still like to see the interface improved to allow grouping of overlay features to at least one or two levels.
There are still some areas of the application which could be improved on but it is still one of the best PDA Topo applications on the market.
Conclusion
Memory-Map Navigator's greatest strengths lie in the availability and quality of digital maps available. Sometimes these may be quite expensive, but the emphasis here must be on the coverage and availability. Certainly for the UK and Northern America the coverage is excellent. However if you are visiting say North Africa and you can get digital map images these will be difficult to calibrate.
The addition of the 1:25,000 scale maps for the more popular outdoor leisure areas of the UK is nothing short of wonderful. However this is tainted slightly by the compatibility issues.
This is not a system for driving and automatic routing, but is defiantly a viable and exciting enhancement to outdoor pursuits. There are far better products on the market for those features, but when you are out walking, or get into a boat or an aeroplane then Memory Map Navigator comes into it's own.
The removal of the capability to calibrate you own maps in the OS editions restrict your ability to use the software in areas where there are no commercial maps available. However that said it was exceedingly difficult to accurately calibrate your own maps.
As with other products of this sort combining Navigator with Pocket Navigator and a GPS device that can connect to both such as the Emtac Bluetooth GPS or maybe a Garmin or similar hand held, that way you get a semi portable and fully portable GPS system which is extremely flexible.
In my opinion the Memory-Map Pocket Navigator is probably the best PDA Topographical system on the market at the moment. Combined with the PC Navigator they make a formidable combination where there is commercial mapping available. |