|
|
 |
 |
 |
 |
|
Memory-Map Pocket Navigator GPS Software for CE devices |
23rd February
2003 |
|
|
Memory-Map
Pocket Navigator GPS Mapping Software is similar to Fugawi,
and OziExplorer: they all target universal GPS users who need pinpoint
positioning both on and off road. The Pocket Navigator software
is provided as part of the PC software package, which retails for
£159.00 including 1:50,000 Ordnance Survey Landranger maps
of the Southern (or Northern) United Kingdom.
Memory-Map
Navigator is a commercially produced application that can be bought
from many sources.
|
 |
Click on image for larger picture |
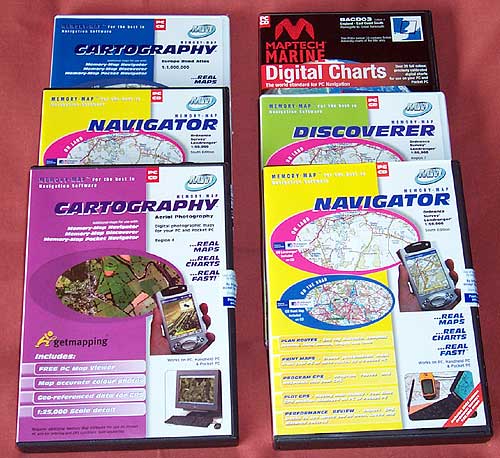
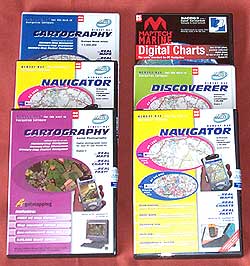
The review package provided by Memory-Map
comprised:
- The Full Navigator
with OS South mapping applications bundled with OS UK route
maps. Retail price: £159.95
- The Digital Aerial photography
for Region 2, 6, and 7. Retail price: £59.95 each.
- The Discoverer maps for
region 7. Retail price £59.95
- Maptech Digital Charts of
England - East Coast South. Retail price £99.95
- Philip's Europe Road Atlas.
Retail price £29.95
This
review will cover the functionality of Memory-Map Pocket Navigator
with some parts of Navigator (PC) focusing on the areas of
integration with Pocket Navigator. The review is centered
around the Navigator product for OS Landranger maps and GetMapping
Aerial photography. Other map coverage is dealt with in a
separate Memory-Map mapping
page. For the full PC Navigator Review, click
here.
|
Memory-Map produce two applications:
Navigator and Discoverer. The main difference between the two products
is that the Discoverer program can display maps whereas the Navigator
application displays maps and can connect to a GPS and display your
position on a moving map.
This review focuses on the Pocket
Navigator application. There is another review which evaluates the
Navigator PC software. Click here
for the PC review. When deciding if the Memory-Map package is suitable
for your requirements you should consider both as a whole solution.
Where the Pocket Navigator version may be marked down it could well
be compensated for in the PC application.
Memory-Map is targeted at the recreational user. This software is useful for and used world-wide
by
hikers, bikers, off-roaders, sailors, and pilots, plus many more.
Memory-Map can license the software for commercial applications.
All
Maps need to be converted and exported to the PDA using PC Navigator.
You have to acquire commercially calibrated maps (a good selection
is supplied by Memory-Map) or create and calibrate your own maps
then download them to the Pocket PC.
The
main features packed into the CE software are:
-
Display
of commercial and user created maps.
-
Live
display of current position using NMEA 0183 GPS interface
-
Display
and logging of track
-
Creation
and display of waypoints (positions on your map)
-
Display
of route
-
Navigation
instructions based on route
-
Tight
integration with the PC version of Navigator
For
the purposes of this review an iPaq 3870 was used with an Emtac
BT GPS and a Garmin eTrex (curtsey of GPS Warehouse) and interface
cable (supplied by PC-Mobile). This review focuses on the
Memory-Map Pocket Navigator software, another review covers the
Memory-Map Navigator (PC) software. |
|
Software Installation
The
Pocket Navigator software comes bundled with the PC Navigator software.
Installation is a little
unusual in that it is started from within the PC Navigator application.
It is a really simple process. All you have to do is connect your
PDA via activesync then select Install Pocket Navigator from the
PDA menu, Navigator handles the rest.
The
Pocket Navigator application does not need any licensing as
it takes the registration details from the PC application. Once
installed all you need to do is download a map and off you go.
The PDA menu
is the main control interface between the PC and the PDA. As you can
see from the graphic above This is used to send maps, database items,
and to transfer tracks, routes and waypoints to and from your PDA |
Reproduced from Ordnance
Survey 1: 50,000 mapping © Crown copyright. All rights reserved.
|
| Creating
a map
To use Pocket Navigator you need maps in the Memory-Map proprietary
Quickchart format. These are created by Navigator either by using
them natively, or by converting different formats when downloading
to the PDA. You do not have to worry about these conversions the
Navigator software handles all the intricacies. All you need to
do is select the area you need to transfer. You can send either
the visible display window to the PDA, or the entire chart.
Memory-Map like other applications of
this type use raster image maps. Unlike vector maps raster maps
are scanned bitmap images and therefore will look identical to
traditional paper maps. Because of this the maps and charts can be extremely
large, particularly the full OS map sections. for example the Nautical
Chart of the Thames Sea Reach is about 6Mb, the OS GB Route Planner
is 22Mb, and the entire region 2 OS Landranger map is 332Mb. So
it would be quite reasonable to store a number of the Nautical charts
on a storage card, but impractical to store whole OS map sections.
The trick is to be selective about which areas you need map detail
for and load the OS GB Route Planner giving full coverage of the
country, and where you need 1:50,000 scale maps select the area
you require. With a 128Mb SD or CF card you can get quite a lot
of coverage.
If you are planning
an extended trip then you must ensure that you have the maps for
the regions you are visiting loaded on your PDA or storage cards
as to transfer additional maps you need access to you PC with Navigator
on it.
|
|
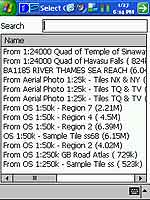
Using the software
When you start the last map or chart you had opened is displayed.
If the map you last used is not available then the chart selection
screen is shown as displayed on the left.
Pocket Navigator uses
a combination of toolbar buttons, menus and tap and hold context
sensitive menus to control it's functionality. This can be quite
confusing at times as it is not always intuitive and can sometimes
be difficult to select the appropriate item when you have a waypoint,
track and route all located at the same point.
In fact the user interface
is not very intuitive and takes a little time to get used to. After
a little usage it becomes much easier, and is worth the effort.
|
Click on the picture for a full size image
|
|
 The
Toolbar The
Toolbar
There are a number of icons on the screen which provide status information,
or allow fast control of the application. This toolbar is permanently
displayed and docked to the bottom of the display.
The first is the menu
button which initiates the cascading menu system which is described
below.
The next two buttons
control the zoom function of the display. The zoom works by doubling
or halving the information shown on the screen. The maximum zoom
out seems to be limited to 200%, though this can sometimes be difficult
to establish as there is no indication of the zoom level displayed.
The next button is the
Alternative View toggle button. The alternative view allows you
to quickly toggle between two different zoom levels of the same
map or chart. Initially the alternative view displays the entire
map but you can zoom in to say 25% or 50% which can give you a good
location view and a detailed position view at the touch of a button.
The padlock button at
first was confusing, but after a quick scan of the help file it
turns out to be a GPS lock. When pressed it will have a white background
and the GPS location will be locked in position on the screen, the
map will move to keep the GPS position visible. If you drag the
map then the lock will retain the current relative position on the
screen. If you do not have a GPS fix then the padlock will be greyed
out.
The next icon is the
data button. When this is toggled and the display is tapped a small
data popup is displayed. This shows the co-ordinates of the tapped
location, and if the GPS is active the distance and bearing to the
point is shown.
The final button is
an information symbol. This is normally greyed out and only becomes
active when there is a problem with the GPS communications. Tapping
on this button displays the error message from the GPS interface.
|
| Configuration
 The
configuration options for the Pocket Navigator are accessed from
the menu toolbar option Menu-> Overlay-> Settings. This will
display the settings dialogue shown to the far right. The
configuration options for the Pocket Navigator are accessed from
the menu toolbar option Menu-> Overlay-> Settings. This will
display the settings dialogue shown to the far right.
From this display you
can set the main options for the software. There are not many items
selectable the main ones being the Units, and the position display.
The units can be set
to either Nautical, Statute, or Metric. This will affect the way
that distances, and heights are reported.
 The
position can be reported in variations of Lat/Lon, 2 flavours of
UTM or British National Grid (Ordnance Survey co-ordinates). The
position can be reported in variations of Lat/Lon, 2 flavours of
UTM or British National Grid (Ordnance Survey co-ordinates).
You can also assign hardware buttons
to zoom in and out. There are options to show the map scale and
altitude where available. |

Click
on the picture for a full size image
|
|  In
Use In
Use
The system is a little difficult to use initially and it takes a
little getting used to. On the first impression there is not much
functionality in the application. This is not the case, there may
be just a single menu with a few items on it but most of the features
are accessed by tap and hold context sensitive menus.
As with
similar applications you need to ensure that the map(s) covering
the area(s) you are travelling to are loaded into the PocketPC, or
storage card, and off you go. If you have a GPS configured then
as soon as you start the application the GPS interface is started
and you position is displayed. You must tap the padlock button to
ensure that the current location is on screen.
All routes, tracks and waypoints
are grouped together and referred to as Overlays. Waypoints are
called 'Marks' in Navigator. The menus allow you to hide or show
either all groups or individual groups. Individual items such as
routes or tracks can be hidden, but to show them again you need
to show all again. The other group shown in the menu is charts,
this shows an outline on the screen when other maps overlap the
currently displayed map.
|
| 
Click
on the picture for full size image |
GPS
Displays
The GPS is configured using
the Menu->GPS->Setup option. This displays the screen shown
on the left.
The
configuration allows for connection to NMEA, Gamin, Magellan, or
NavMan. Although there is a Model listbox this is fixed for all
options of Manufacturer. You then select the comms port and speed
and off you go.
Depending on the type of GPS manufacturer
selected options are enabled to either import or export your tracks,
routes and mark to the GPS unit. This is not documented in the help.
Out of curiosity I connected the
Garmin eTrex to the iPaq and managed to successfully transfer waypoints,
routes and tracks between the two devices.
|
 |
Click on the picture for full size image
Reproduced from Ordnance
Survey 1: 50,000 mapping © Crown copyright. All rights reserved.
|
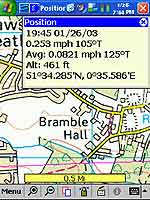
The other GPS related displays provide information about your position
and the number and strength of signal being received.
The image to the left shows your
current position speed, altitude, and average speed. In this example
the system was configured to display lat/lon, it can be configured
to show British National Grid (OS style) co-ordinates.
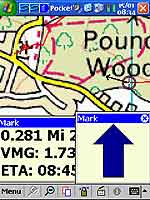
The picture to the right shows the
satellite status. This is the only status display in the system.
There are no NMEA output, or traditional sky view displays.
The final element of the GPS is the
"Position Overlay" this is the current GPS position. One
of the properties of the position is a "velocity vector",
this shows how far you will travel if you keep on the same course
and speed.
|

Click
on the picture for full size image
Reproduced from Ordnance Survey 1: 50,000 mapping © Crown copyright.
All rights reserved.
|
Marks
or Waypoints
Pocket Navigator uses the term Mark for traditional waypoints. I am not really sure where "Mark" originated, but Garmin use it on their handheld GPS devices, I guess it probably came from creating a pencil mark on a map.
These
marks can be assigned different symbols to indicate what the waypoint actually is. Waypoints can be associated with files making them hotspots. Waypoints can also define a radius around a waypoint making a proximity alarm.
Creating a waypoint is done from the Overlay menu using "Create Mark". Once you have selected this you tap on the screen at the point where you want the waypoint placed.
Waypoints are created with default settings. To change them you need to tap and hold on the waypoint which will bring up a context sensitive menu giving options for: Navigating to the mark, Opening a file, Hiding it, locking it, sending it to the GPS (Garmin or Magellan), removing it, or displaying it's properties.
|
Click for full size Image
|
The properties display shown above right enables various aspects of the waypoint to be configured.
Firstly you can name it the default name is "Mark". There appears to be no restriction insisting on unique names so if you are not careful you will end up with lots of waypoints called Mark. The tick box Label indicates if the waypoint name is to be displayed on the map. This is great for primary waypoints such as Mountain peaks, or for naming buoys. A little further don the display is the GPS Name this is separate to the Name because the handheld GPS receivers are more restrictive in their naming conventions.
The position is displayed and editable using the co-ordinate system specified in the options setup. This is one way of moving the waypoint to a precise location, another is to simply tap and drag the waypoint to it's new position.
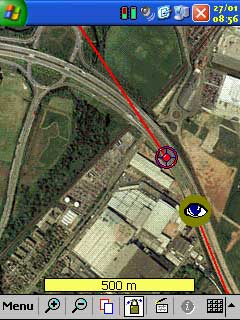
You can associate a file with the waypoint. This makes the waypoint a
Hot Spot. You can browse to the required file and select it. A nice, and sometimes confusing, feature is that whenever a file is created in the "my documents" folder whilst Pocket Navigator is running will create a hotspot with the icon set to the icon of the application. As can be seen in the image to the right a screen shot had been taken a few seconds before this one leaving a picture in the
my documents folder. The icon for the viewing application is an eye. It took us quite a while to figure out what was going on. You can also make voice recordings, or notes which attach themselves to your maps.
|
Click for full size Image
Reproduced from Get Mapping © Get Mapping plc 2002. All rights
reserved.
|

The alarm setting creates a proximity alarm for the waypoint. A proximity alarm waypoint is entered in meters radius from the waypoint, and is shown as a hatched red circle surrounding the waypoint as in the picture to the left. When you enter the area of the alarm the PDA default alarm is sounded.
The proximity alarm can be configured in one of two ways a Proximity Alarm as described above, or an Anchor Alarm. The Anchor Alarm sounds when you leave the proximity circle and continues until you are one nautical mile from the waypoint.
The final configuration option is the Icon to be displayed on the map. This can be selected from a small selection of images, or can be the icon associated with the attached file. Setting the default
tick box will make this the default icon to be displayed when creating additional waypoints. |
|
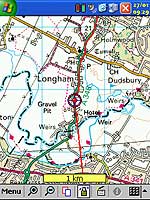
Tracks
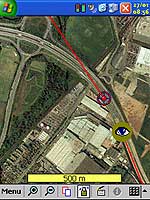
Tracks are recorded points on your journey. You can configure your tracks by tap and hold on the screen and selecting properties. This will display the dialogue on the far right. From this you can name tracks, colour them and set the point collection criteria.
You can also show
and hide the tracks on the map by selecting the show all or hide all option from the overlay menu, or by showing all tracks and then individually select, tap and hold and hiding the ones you do not want to view.
You can also reduce the number of recorded points in the track.
The image above on the right shows the track being recorded on a car journey in Hampshire. The circle is the current GPS position, and the straight line is the velocity vector.
|
 |
 |
|
Click
on image for larger picture
Reproduced from Ordnance
Survey 1: 50,000 mapping © Crown copyright. All rights reserved.
|
The velocity vector shows where you would be if you stayed on the same course for a certain amount of time.
There is no list of tracks or obvious way of splitting or combining tracks. |
| 
Click images for full size pictures
Reproduced from Get Mapping © Get Mapping plc 2002. All rights
reserved.
|
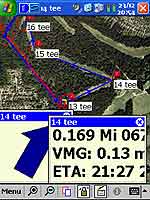
Routes
and Navigation
Routes are a series of waypoints linked together. There can be a
number of routes in Pocket Navigator. Routes can also be created
in Navigator on the PC and downloaded into Pocket Navigator.
You can either create
a route on the PC or the PDA. To create a route tap on Menu> Overlay>
Create
Route. Then you go to the map and tap at the critical points for
your journey, double tapping on the last waypoint. Your route is
complete, its as simple as that.
Oops I made a mistake
a couple of the waypoints are not in the right place. No Problem.
All you have to do is is tap, hold, and drag the waypoint to where
it should be. Forgotten to include a waypoint or need to refine
the route more, tap and hold in between the points on the route
the select the Insert WP option and just drag the waypoint to it's
required position.
When you are ready to
navigate the route all you have to do is tap on the route and select
the follow route option. This will start the navigation. As you
reach a waypoint in the route the next point will automatically
be selected. The images to the left and right show navigation screens.
When testing the application the navigation whilst walking was a little problematical as the velocity vector tended to be inaccurate, and thus the navigation pointer was often pointing in the wrong direction, despite a similar pointer on the Garmin connecting to the PDA showing the correct direction
|
Click image for full size picture
Reproduced from Ordnance
Survey 1: 50,000 mapping © Crown copyright. All rights reserved.
|
.
The
Navigation popup windows can be resized by clicking and dragging
to make them smaller or larger. You can also close individual windows
and place them where you want them on the screen.
From the route context menu you can
select profile. This will display the route's altitude profile.
This is very similar to that of PC Navigator. |
| Maps
Even if the software has the best functionality in the world it's
usefulness really depends on the quality and quantity of the maps
available for the package. Well if you live in the right part of
the world the maps are really great. If not then it will be difficult
using this system.
There is a separate
article describing the maps available for Memory-Map which can be
read by clicking here
Fortunately for all
of us living in the UK the major strength of the Memory Map Navigator
package is the bundling of the UK Ordnance Survey 1:50,000 scale
maps. These cover the entire UK and also includes elevation data
for the total mapping area. In the tests that we carried out the
maps were extremely accurate and very current. A road opened last
year was present on the maps provided.
If you are nautical
you will also benefit from the ability of Pocket Navigator to use
the Maptech BSB Nautical Charts. I have looked at the UK charts
for the Thames region, but have not been able to review them as
the sailing season doe not start for a few months. I know a few
people with boats and will be arranging to review these in the spring
sometime.
If you are an aviator
then you will find that Memory-Map has CAA 1:500,000 and 1:250,000
VFR Charts that cover the whole of the UK.
Users who either live
or travel to America can use the USGS DRG maps either the free maps
downloadable from the Internet, or purchased from various retailers.
Although I was successful at importing these maps I was not able
to verify the accuracy of the import.
|
|
Strengths
and Weaknesses
As with other applications of this type a major issue is obtaining
or creating maps if you do not live in the right part of the World.
This product is very
much targeted at the UK market, and as such contains excellent
mapping for the UK. No mater what your interest there is a set of
mapping products available. There is a possibility that there will
soon be 1:25,000 scale maps available, which would make things perfect
for hikers and mountain bikers.
In the USA the government
makes digital mapping data freely available. In the UK and other
countries this information is sold at commercial rates. There is
some mapping products in BSB format for European countries and
patchy coverage elsewhere. Outside these areas it is very difficult
to obtain digital maps, or to use your own calibrated images.
There
were a number of faults and niggles identified whilst testing, but
none of these were major. The main bones of contention were the
user interface which took some while to get used to, and the lack
of management facilities for routes and waypoints. The addition
of route lists, waypoint lists, better management of the display
of overlay elements, and a better user interface would make this
a perfect product. But then what would they be able to add next.
I have it on good authority that this is being worked on for a
future release.
|
|
Digital Scanning of Maps and Downloading of Digital Maps Disclaimer
All maps do hold a copyright notice to prohibit the copying of the maps. Please check the terms and conditions of the copyright and your rights before digitally scanning any paper maps or downloading of any digital maps from websites. Most mapping companies will grant you a license to make at least one copy of the map for personal use only, however please check first and if requested to do so, request permission from the copyright holder first before scanning or downloading the digital maps.
Ordnance Survey Copyright Restrictions
Permission to scan an Ordnance Survey paper map (which is less than 50 years old) for retention on a retrieval system must be requested in writing stating the purpose of scanning Ordnance Survey maps, scale of mapping to be used and total area to be scanned in cm squared at original scale. Permission will not be given if the customer can be supplied with an equivalent digital mapping product from Ordnance Survey. A one off data royalty charge will also be applied, calculated using the number of mapping units scanned, and the customer must hold a Digital Licence with Ordnance Survey. |
|
|
 |
 |
 |
 |
|
|