|
Review by
Dave Burrows
Something we find ourselves explaining time and
time again in the forums is how to run diagnostic software against your GPS
Receiver to check to see if it's working, has a problem, or if you just have it
configured wrongly. These instructions help to walk you through the
diagnostic software of choice that we use (Leadtek WinFast Navigator) on the
Pocket PC. The is a version available for the PC also, but this article
will specialise in the Pocket PC version. We will also detail how to test
Time To First Fixes (TTFF) with your GPS Receiver which will show you how to reset the
receiver into a Factory, Cold, Warm and Hot state.
WARNING! If you do not
follow these instructions completely, or you start to mess around with figures
in various screens, we cannot be held responsible for rendering your GPS
Receiver useless. Although you cannot physically break your GPS Receiver,
if you start messing around with NMEA or SiRF settings you can effectively make
your GPS Receiver appear that it's not responding, trying to get it out of this
state is difficult to talk you through, so be warned, do not stray from these
instructions!
Installing WinFast Navigator
We have a version of WinFast Navigator available
from our download page. Download this and install it to your Pocket PC.
Once installed you should find Navigator showing on your Start Menu.
Brief Introduction of SiRF and NMEA
Connecting to the GPS Receiver is the first hurdle
to overcome, but first a brief introduction. Firstly there are two GPS
Standards, NMEA and SiRF. Although SiRF is the up and coming new boy on
the block, NMEA is the acquired standard and one used by 95% of GPS
applications. Why two standards ? NMEA is getting old, it was
designed to talk at 4800 baud (4kbps). Modem speeds today are 56kbps so
you can see NMEA is slow. SiRF has brought about that change by increasing
speeds and utilising full serial speeds up to 115200kbps. The thing is
although NMEA is slow, some GPS Receivers will work at higher than 4800, but
this is what NMEA prefers. The amount of GPS data sent down the serial
port is very small and can easily be transmitted in 4800 baud so although you
could reach higher speeds, there isn't really any necessary to do so. SiRF
uses higher speeds because it can transmit the data quickly and put the
processor into a wait state which in theory means it utilises less power, newer
SiRF chipsets like SiRF IIe also have low power consumption which help even
further with sustaining power to the GPS Receiver.
Connecting to your GPS Receiver
Now you know there are two standards, and that
most applications work in NMEA, what we need to do is connect to the receiver in
NMEA. Run WinFast Navigator and you'll be greeted with the WinFast
Navigator Screen.
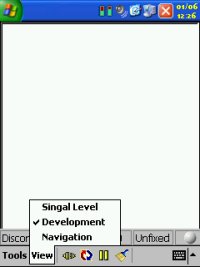
The first thing you need to do is tap VIEW |
DIAGNOSTICS. This will present you with another blank screen. This
is the diagnostics screen and it's best to be sitting on this when you try to
connect.
If you don't see any legible data appear on screen
when connected (later), then you've got the wrong settings. Connecting to
the GPS Receiver is hit and miss, trial and error until you find the correct
settings.
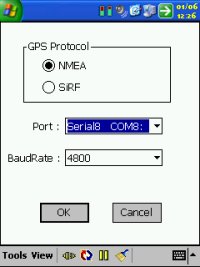
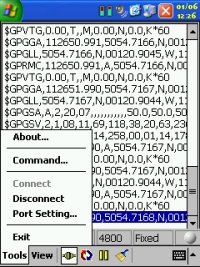
Now tap TOOLS | PORT SETTINGS and you'll be
greeted by a screen like below. This shows you the protocols available (eg
NMEA and SiRF), the Serial Port you will connect on and the Baud Rate to use.
We said earlier we would use NMEA, so make sure
this is selected, skipping to the baud rate, we know that NMEA prefers most of
the time to use 4800 so we can set this easily.
Jumping back to Port, if you know you are
connecting to a GPS Receiver that plugs into the bottom of the sync port,
99% of the time this is regarded as Serial1 COM1, so you can set it to this.
If however you have a Compact Flash GPS
Receiver, the easiest way is to cancel, eject the receiver, and then plug it
back in again and it should pop up a dialog box and tell you what COM port it
will use.
If you're using a Bluetooth GPS receiver,
you can check the COM port that's being used by going into the Bluetooth Manager
and checking the settings as it should tell you which COM port will be used for
Bluetooth connectivity. With that said, we should now have all of the
settings we need.
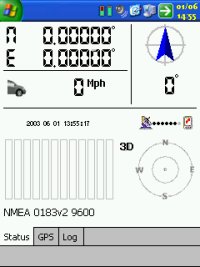
Tap the OK
button. What should happen is that you'll be taken back the the
Development screen in WinFast Navigator. You should see a screen like the
one below (left). If you don't, and you are seeing a screen like the one
below (right) then you have the wrong settings.
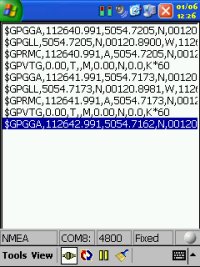
The data in the above (left) screenshot should
start appearing within 5 seconds of reaching this screen. If it doesn't,
go through the process again. If you are sure you have the correct COM
port, then all you need to do is change the baud rate. Try 9600 (this is
what the Pretec Compact GPS Receiver uses). Other receivers like the
Pretec LP use COM 5 or COM 6, the Navman sleeve does something similar.
Like we said above, it really is a matter of trial and error. At this
stage you can not break the receiver, all you are trying to do is connect to the
device on the above settings, so don't worry if it doesn't work, it won't cause
problems with other applications as you are not saving anything to the EPROM
(chip).
At this stage if you have managed to successfully
see the data coming through on the development screen and you have been
experiencing problems with your GPS Receiver not working, then there is nothing
wrong with the receiver, the problem is probably in the driver of the software
you are using. If you were experiencing problems and still are, with no
data appearing on screen, then it could be either you still have the wrong
settings, or the GPS Receiver is faulty.
Testing for Time To First Fixes
We know that TTFF's can change, and do
erratically. It all depends on whether you have clear line of sight to
each satellite, and there are countless things that can delay the data, or the
GPS program assumes data which may not be correct.
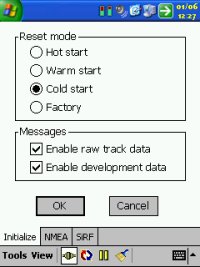
Once you have a successful connection and you have
NMEA data coming through on the Development screen, then what you can do is tap
TOOLS | COMMAND and you'll be greeted by a screen like to the right. This
will by default put you on the Initialize tab. In here you have options
for resetting the GPS. If you didn't know, the GPS has two types of
databases. The Almanac details what satellites are out there, and their
projected positions in the sky, and this is usually current for a couple of
months use. The Ephemeris data is more accurate data about signal
strength, altitude and where they are exactly in the sky. The Ephemeris
data is only current really up to a couple of hours, after this time you have to
download the complete Ephemeris data which takes 30 seconds under supreme
conditions. Almanac data with Ephemeris will take around 12.5 minutes.
One way of testing a receiver in a cold state would be to acquire a 3D fix and
then power it off for 4 hours, then test again and you should then have to
re-download the Ephemeris data. Another way is to foil the GPS into
thinking it doesn't have it by wiping that data. This is what the options
on this screen does. A Cold restart will lose all Ephemeris data, a Warm
restart will lose a small segment of this data, and a hot start will lose
virtually no data, and this will effectively simulate a GPS Receiver being
powered off for a period of time. Once you click Hot, Warm,
Cold or Factory and leave the MESSAGES tick boxes enabled and tap OK, this is
what you will be doing, simulating this type of start. This is a harmless
test, and you can time TTFF's yourself. The one thing to bear in mind is
you can initiate a cold start and it will come in say at 49 seconds, another
cold start may come in at 36 seconds, a third cold start will come in at 53 secs.
You'll see a picture forming here, no TTFF will ever be the same due to
conditions and data. That's why in our tests we take 5 Cold TTFF's and
take an average. Cold TTFF's are what people are mainly concerned about,
mainly because a Cold TTFF is what you'll see when you come home from work,
power off the GPS Receiver, then power it on 8-12 hours later in the next day
when you go to leave for work. Cold TTFF's are always what people complain
about if it takes a long period of time. Now if you are receiving a TTFF
of 2 mins plus, you either don't have a good sight of the sky, or you have a
weak antenna, if you see TTFF's of 3-5 mins, get a new receiver, it shouldn't
take this long! 50 seconds is probably the norm you will see, certainly
below 60 seconds. Remember when you tap OK you'll be taken back to the
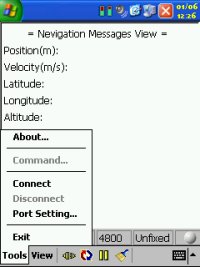
Development screen. Once you're happy you know data is coming through, you
can select VIEW | SIGNAL LEVEL or VIEW | NAVIGATION for a different perspective
of where satellites are.
Getting Technical
Okay, so you've been messing about a bit and you
feel as though you're happy with all of the above, you can consistently get a
connection with the GPS Receiver, and you're happy with it's output. You
want to start tweaking the GPS Receiver. Perhaps with the GPS Receiver you
are using, you're getting the amount of satellites you have a lock on, but
you're not seeing any signal strength in the GPS application you're using, or in
WinFast Navigator ? This is where we get technical. Under NMEA
(protocol) you get different string types. All of these contain data like
a database. A table of the current NMEA sentence codes are listed below
and a description has been added. We have also highlighted some sentence
codes in bold. These are the ones you will normally see a lot of.
| String Type |
Description |
| $GPAAM
|
Waypoint Arrival
Alarm |
| $GPALM |
GPS Almanac Data
|
| $GPAPA |
Autopilot format
"A" |
| $GPAPB |
Autopilot format
"B" |
| $GPASD |
Autopilot System
Data |
| $GPBEC |
Bearing &
Distance to Waypoint, Dead Reckoning |
| $GPBOD |
Bearing, Origin
to Destination |
| $GPBWC |
Bearing &
Distance to Waypoint, Great Circle |
| $GPBWR
|
Bearing &
Distance to Waypoint, Rhumb Line |
| $GPBWW
|
Bearing,
Waypoint to Waypoint |
| $GPDBT
|
Depth Below
Transducer |
| $GPDCN
|
Decca Position
|
| $GPDPT
|
Depth
|
| $GPFSI
|
Frequency Set
Information |
| $GPGGA
|
Global
Positioning System Fix Data (Time, Position, Elevation) |
| $GPGLC
|
Geographic
Position, Loran-C |
| $GPGLL
|
Geographic
Position, Latitude/Longitude |
| $GPGRS
|
GPS Range
Residuals |
| $GPGSA
|
GPS DoP
(dilution of precision)
and
Active Satellites |
| $GPGST
|
GPS Pseudorange
Noise Statistics |
| $GPGSV
|
GPS
Satellites in View |
| $GPGXA
|
TRANSIT Position
|
| $GPHDG
|
Heading,
Deviation & Variation |
| $GPHDT
|
Heading, True
|
| $GPHSC
|
Heading Steering
Command |
| $GPLCD
|
Loran-C Signal
Data |
| $GPMSK
|
Control for a
Beacon Receiver |
| $GPMSS
|
Beacon Receiver
Status |
| $GPMTA
|
Air Temperature
(to be phased out) |
| $GPMTW
|
Water
Temperature |
| $GPMWD
|
Wind Direction
|
| $GPMWV
|
Wind Speed and
Angle |
| $GPOLN
|
Omega Lane
Numbers |
| $GPOSD
|
Own Ship Data
|
| $GPR00
|
Waypoint active
route (not standard) |
| $GPRMA
|
Recommended
Minimum Specific Loran-C Data |
| $GPRMB
|
Recommended
Minimum Navigation Information |
| $GPRMC
|
Recommended
Minimum Specific GNSS GPS/TRANSIT Data
(time, position, velocity)
|
| $GPROT
|
Rate of Turn
|
| $GPRPM
|
Revolutions
|
| $GPRSA
|
Rudder Sensor
Angle |
| $GPRSD
|
RADAR System
Data |
| $GPRTE
|
Routes
|
| $GPSFI
|
Scanning
Frequency Information |
| $GPSTN
|
Multiple Data ID
|
| $GPTRF
|
Transit Fix Data
|
| $GPTTM
|
Tracked Target
Message |
| $GPVBW
|
Dual
Ground/Water Speed |
| $GPVDR
|
Set and Drift
|
| $GPVHW
|
Water Speed and
Heading |
| $GPVLW
|
Distance
Traveled through the Water |
| $GPVPW
|
Speed, Measured
Parallel to Wind |
| $GPVTG
|
Track Made
Good and Ground Speed (
Course over ground and ground speed
) |
| $GPWCV
|
Waypoint Closure
Velocity |
| $GPWNC
|
Distance,
Waypoint to Waypoint |
| $GPWPL
|
Waypoint
Location |
| $GPXDR
|
Transducer
Measurements |
| $GPXTE
|
Cross-Track
Error, Measured |
| $GPXTR
|
Cross-Track
Error, Dead Reckoning |
| $GPZDA
|
UTC Date / Time
and Local Time Zone Offset |
| $GPZFO
|
UTC & Time from
Origin Waypoint |
| $GPZTG
|
UTC & Time to
Destination Waypoint |
What does an NMEA and SiRF stream look like ?
Take a look at the two screenshots below, the first is an NMEA stream, and the
second is a SiRF stream. As you can see, these are totally different and
require specific knowledge on both NMEA and SiRF string sets.
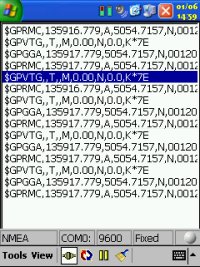
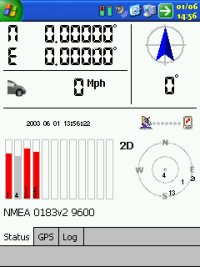
Now one problem a lot of people experience is that
you are receiving the total number of satellites you have a 3D fix on, but you
are not seeing any satellite information for each satellite that would usually
show signal strength. The reason for this would be that GPGSV isn't
enabled as part of the NMEA string. You'll see this in the first
screenshot below. If you exit TomTom GPS Status screen and then run up
WinFast Navigator, connect to the GPS Receiver, then go into the COMMAND option
and for this test we will make sure GSV is set at 5, then tap OK. What I would recommend is that
you set GGA=1, GLL=0, GSA=5, GSV=5, RMC=1, VTG=1, MSS=0, User=0, User=0, User=0.
When you tap the OK button, it should then enable it. Disconnect, run up
your regular GPS program and check the satellite status now, you should now see
satellite bars like in the second screenshot below.
 Later
on you may want to change the above settings, e.g. these will depend on the
requirements you have against your navigation program. Do you see the need
to see the satellite status every five seconds ? Or is it enough to see
them every 20 seconds ? All you really need for your navigtation program
is a frequent update of your location (either RMC or GGA will do) and speed (VTG).
Again when you make these changes verify that your navigation program does still
work as expected. Unfortunately some applications prefer different sets of
base data, so you may have to adjust the NMEA output to your program's
preferences. You also have to be careful when changing these settings on the NMEA and SIRF screens. The settings you see here are not from the GPS Receiver,
these are default settings within WinFast Navigator. Later
on you may want to change the above settings, e.g. these will depend on the
requirements you have against your navigation program. Do you see the need
to see the satellite status every five seconds ? Or is it enough to see
them every 20 seconds ? All you really need for your navigtation program
is a frequent update of your location (either RMC or GGA will do) and speed (VTG).
Again when you make these changes verify that your navigation program does still
work as expected. Unfortunately some applications prefer different sets of
base data, so you may have to adjust the NMEA output to your program's
preferences. You also have to be careful when changing these settings on the NMEA and SIRF screens. The settings you see here are not from the GPS Receiver,
these are default settings within WinFast Navigator.
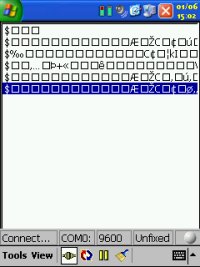
There is no way of easily telling what the GPS is
set to with WinFast Navigator, so if you set something here, it could look like
it's rendered your GPS Receiver useless. If you start getting garbage
appear on the DEVELOPMENT screen, e.g. lots of % or fraction symbols or square
blocks, then there's something wrong.
This can sometimes happen when you try to set the
GPS to an invalid baud rate. Simply switching it back to the correct baud
rate can still appear as though the receiver is not functioning correctly.
You'll see some garbage in the screenshot to the right.
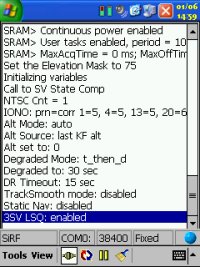
The best thing you can do here is to switch it to
SiRF mode, you will see a different set of text (eg not the sentence strings in
the table above), but you should be able to read it as the text will be in
English. If this then works, go back into the COMMAND option and switch
back to NMEA.
Breakdown of the GPS Sentence
If you take the GPRMC line from the NMEA sentence as:-
$GPRMC,181573,A,4823.029183,N,07384.874834,W,000.09,183.4, 131200,1.8,W,D*25
You will then be able to break this down as follows:-
$GPRMC = Sentence ID
181573.00 = UTC (Coordinated Universal Time) of position fix in hhmmss.ss format (18 hours, 15 minutes and 73.00 seconds)
A = Status (A = data is valid, V = warning)
4823.029183 = Geographic latitude in ddmm.mmmmmm format (48 degrees and 23.029183 minutes)
N = Direction of latitude (N = North, S = South)
07384.874834 = Geographic longitude in dddmm.mmmmmm format (73 degrees and 84.874834 minutes)
W = Direction of longitude (E = East, W = West)
000.09 = Speed over ground in
knots (0.04 knots)
183.4 = Track made good (heading) (183.4)
131200 = Date in ddmmyy format (December 13, 2000)
1.8 = Magnetic variation in degrees
W = Direction of magnetic variation (E = East, W = West)
D = Mode indication (A = autonomous, D = differential, N = data not valid)
25 = Checksum (following asterisk delimiter)
If the GPS receiver is not operating properly or it hasn't received a 3D Positional fix then most of the values will be left out and you will just see commas instead. In the above example you can see that both the latitude and longitude values included in the NMEA sentence are represented in degrees, minutes, and decimal minutes. The latitude is shown as ddmm.mmmm, and the longitude is shown as dddmm.mmmm (see the extra d). You will then see the direction of Latitude and Longitude as N, S, E, W (North, south, east and west).
Summary
Hopefully this tutorial has given some insight
into what happens behind the scenes with your GPS Receiver, and has helped you
see how GPS operates and how to fault find problems with your GPS Receiver.
Hopefully it has also empowered you into taking your own TTFF's and seeing
whether or not you should be looking to change and upgrade to a better GPS
Receiver.
|