Installation Instructions
To install, download the correct package type that matches your safety camera download type, i.e. if you use the 'Consolidated by type' version of the database you will need the 'Consolidated by type' sound file set.
Method 1
Version 7 Users Please Read Additional Notes Below
- Extract the contents of the downloaded zip file and copy these to the map folder on your device. The suitably named ogg files should be placed into the map folder where your POI’s are located, do not put them in a sub-folder.
- With the files in place start TomTom Navigator and go to Change Preferences/ Manage POI/ Warn when near POI (this MUST be done even if your camera POI’s have been previously configured).
- Select the first camera in the list, if asked whether you want to delete or remove the warning answer NO.
- You should now be asked to select the warning distance, followed by the Warn Only if POI on route – please set-up these options as per your normal preference, remember everyone will use different settings dependent upon how they use the device.
-
Note: You will be asked to choose a sound but will not be offered any options, this is normal. You will be asked 'Is this the sound you want?'. You should answer Yes on this screen. If you do, you will then see the warning distance screen and can proceed as normal.
If you mistakenly answer No then you may get a message saying No Photographs and the unit will freeze. If you have mistakenly done this, simply reset the device and start again, this time answering Yes when prompted.
- Now repeat the above, setting up the POI warning for EACH camera category you have installed to the device.
TomTom models with TTS (text-to-speech) capabilities only:
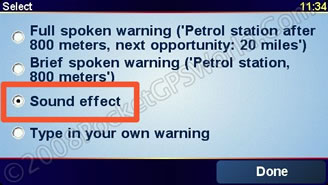
In order to use the ogg files you must ensure "Sound Effect" is selected when configuring your POI Warnings. if you have correctly installed the matching .ogg files then this will be the default selection for all POIs that have an accompanying .ogg file of the same name:

NOTE: If at any point you experience issues then soft reset and retry, this cures the vast majority of issues that can occur.
Method 2
With the arrival of v7 software a new method is now available that allows you to add your own sounds or voices for POI warnings.
If you explore your TomTom device with a file manager (e.g. Windows Explorer, Finder etc) you should find an empty folder called "sounds" (if not, then you can manually create one). Any .wav or .ogg format sound files you paste into this folder will appear on the same page as the usual Sound Effects such as "Bell1", "Cow" etc.
You can also paste folders containing collections of sound files in this "sounds" folder and they will appear as clickable folders.
Ogg files are preferred as their file sizes are much smaller than wavs. If you need to convert .wav files to .ogg format you can use the free sound editor "Audacity" to achieve this. Note that .wav files can be 11025kHz or 16kHz sample rate but MUST be 16 bit. 8 bit samples will be displayed as options on the page but cannot be played.
All the TomTom format sound files available here are compatible with this installation method, you can place them in the sounds folder, select them and preview them in the same way you can the other built-in sound effects.
The only problem here is that the naming convention we use puts pocketgps_ at the beginning of the filename. This is necessary to support our preferred installation method above which requires the sound files have identical file names to the database files they are intended for use with. This results in the part of the name which identifies the sound effect being at the end i.e. pocketgps_uk_gatso_30.
When you see the files on the sound effects page, only the first 10 or so characters of the name get shown, so they will all just show "PocketGPSWo...". Either use the 'preview' button to hear them first or rename the files before copying to the sounds folder to make them more easily located i.e. gatso30, specs70 etc
|